รับออกแบบเขียนคำสั่ง AutoCAD ด้วย Auto LISP เคล็ดลับ AutoCAD,โปรแกรม AutoLISP,Visual LISP,Perspective3D 2013 ~ SiAni_3D Auto LISP

Perspective 3D บูธสินค้า

ทำภาพ Perspective 3D บูธสินค้าต่างๆ

AutoLISP and Visual LISP

AutoLISP and Visual LISP โปรแกรมที่จะช่วยในการทำงาน ของ AutoCAD ง่ายและรวดเร็วขึ้น

ถอดแบบเฟอร์นิเจอร์

รับถอดแบบเฟอร์เจอร์ทุกชนิด จัดทำ Drawing , Assembly ,Parts,Fitting,Packing

This is default featured slide 4 title

Go to Blogger edit html and find these sentences.Now replace these sentences with your own descriptions..

This is default featured slide 5 title

Go to Blogger edit html and find these sentences.Now replace these sentences with your own descriptions..

วันพุธที่ 16 ตุลาคม พ.ศ. 2556

[AUTO LISP] - CHAIN คำสั่งเขียนโซ่


Chain - Draw a chain like drawing a line. From point to point to point. This program uses two blocks, chain1.dwg (the open link) and chain2.dwg (the closed link). The closed link has a wipeout behind it to trim the open link. You will have to have the wipeout enabler installed for Release 14 thru 2002. You can get this at Autodesk.com. See other notes about the program inside the CHAIN.lsp file.


การใช้งาน 


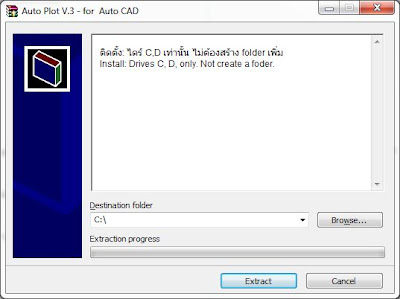
1.download lisp และแตกไฟล์ ZIP จะได้ Folder  Chain  จัดเก็บไว้ ตามอรรถยาศัย
2. เปิดโปรแกรม Auto CAD  เปิด options  การตั้งค่า  เลือก แถบ file


  • จากนั้นเลือก Support file search path
  • คลิก ปุ่ม add 
  • คลิก ปุ่ม browse
  • เลือก  Folder  Chain ที่เป็บไว้เมื่อตะกี้นี้ 

3.คลิก Apply และ ok จบการตั้งค่า  (เปิดไฟล์ template ใหม่)

4.โหลด lisp chain เข้ามาใช้งาน

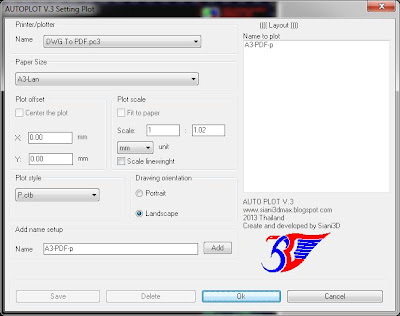
5.พิมพ์ คำสั่ง chain   
  • ใส่ขนาด scale โซ่
  • คลิกจุด เริ่มต้น 
  • คลิกจุด ที่ต้องการสร้าง โซ่ ต่อๆไป


เครดิต : http://www.jefferypsanders.com/autolisp_CHAIN.html

วันจันทร์ที่ 14 ตุลาคม พ.ศ. 2556

งาน BOOTH HITACHI


วันพฤหัสบดีที่ 3 ตุลาคม พ.ศ. 2556

[AUTO LISP] จัดตำแหน่ง text

[AUTO LISP] Positioning text


โปรแกรมจัดตำแหน่ง text ในแนวแกน X และ Y

วิธีการใช้งาน

1. พิมพ์ คำสั่ง
tx  (จัดตำแหน่งแนวแกน x)
ty  (จัดตำแหน่งแนวแกนy)

2.เลือก text ตำแหน่งอ้างอิง


3.เลือก text ที่ต้องการให้อยู่ในตำแหน่ง แนวแกน x หรือ y  ตาม text ที่อ้างอิง


ตัวอย่าง ผลลัพธ์ที่ได้  ในตำแหน่งแกน Y


วันอาทิตย์ที่ 3 กุมภาพันธ์ พ.ศ. 2556

AutoLISP-Auto Plot V.3 คำสั่งปริ้น อัตโนมัติ


การใช้งาน


การติดตั้ง
Install

ให้แตกไฟล์ v3.rar ออก จะได้ไฟล์  Auto plot v3.exe
(Unzip file v3.rar    Result a Auto plot v3.exe)


เปิดไฟล์ Auto plot v3.exe เลือก ติดตั้งไดร์ C หรือ D เท่านั้น ไม่ต้องสร้าง folder เพิ่ม
( Open file  Auto plot v3.exe  Install: Drives C, D, only. Not create a foder.)


เมื่อติดตั้งเสร็จจะได้แบบนี้
(Result)


เปิดโปรแกรม Auto CAD
พิมพ์ Appload หรือ ap  และ Enter

1. คลิก Contents 
2.คลิก Add
3.เลือกไฟล์ Auto plot v3.VLX ใน  folder
   D:\Auto-LISP\Auto Plot v.3 หรือ C:\Auto-LISP\Auto Plot v.3 ตามที่ติดตั้ง
4.คลิก Add   จากนั้น คลิก Close ทั้งหมด 

เปิด tamplate ใหม่ เพื่อเริ่มใช้งานโปรแกรม


( Open Auto CAD
Press Appload or ap  and Enter

1.Click Contents 
2.Click Add
3.Select  file Auto plot v3.VLX   in  folder
   D:\Auto-LISP\Auto Plot v.3  or  C:\Auto-LISP\Auto Plot v.3 
5.Click Add   and Click Close all

Open new tamplate to start the program.)


คำสั่ง
v3    - ตั่งค่า plot
r0 (อาศูนย์)- ตั้งค่าลิมิต plot model
0   (ศูนย์) - plot 
00  (ศูนย์ศูนย์) -ตั้งค่า plot หลายไฟล์  
ยกเลิก  plot หลายไฟล์   พิมพ์ 0 หรือ  00


Command 
v3 - setting plot.
r0 - set limit plot model
0 (zero) - plot.
00 (zerozero) - plot multi files   .
remove plot multi file press 0 or 00.


    Trial


    13.9 $


Related Posts Plugin for WordPress, Blogger...